The following steps describe how to setup your Nexus with a Windows based computer running Megastar using default factory settings.
1. Please connect your Windows based PC/laptop to Nexus’s network. It usually takes a couple of minutes until Windows connects and gets the IP address.
2. In order to use Nexus with Megastar it is necessary to setup a Virtual Serial Port to TCP/IP redirection utility. HW VSP3 is used in this guide. It is free for personal use and can be downloaded from:
http://www.hw-group.com/products/hw_vsp/index_en.html
Install and run the utility and select ‘Virtual Serial Port’ tab. Click on the ‘Login’ button and then select a ‘Port Name’ (use COM3-COM8 as Megastar cannot access serial ports higher than 8), set IP address to 169.254.1.1 and ‘Port’ to 4060. Then click ‘Create COM’
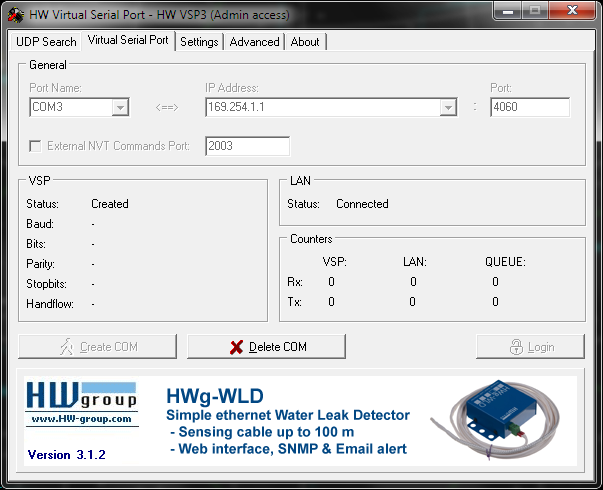
Please make sure that ‘Status’ says ‘Created’. In case of an error just click ‘Delete COM’ then select another ‘Port Name’ and try again.
Please take a note of the name of the ‘Port Name’ as it is necessary to use that name later on.
You can also use another utility from:
http://www.astrogeeks.com/AstroGeeks/COM2TCP/index.html
3. Run Megastar now. Please go to the menu ‘Scope->Select Interface’ and select either ‘Tangent Instrument’ or ‘BBox/Sky Wizard CTI’.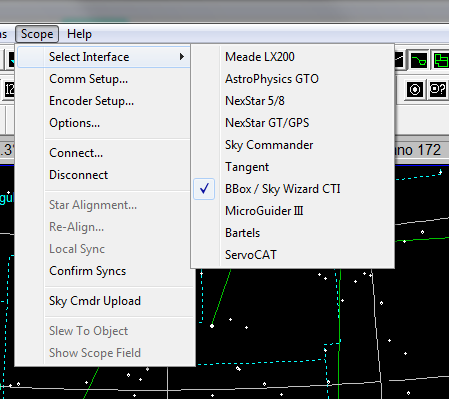
4. Then it is necessary to setup communications by going to the menu ‘Scope->Comm Setup’. Please select set ‘Com Port #’ to the same name as was specified in step 2.

All other settings can be left set to their default values.
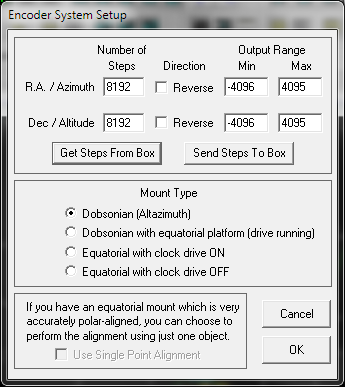
5. Now it is time to specify the encoders’ parameters by going to the menu ‘Scope->Encoder Setup’. In this example encoders with 8192 steps per revolution are used. Set the ‘Min’ parameter to half the resolution of the encoder with the ‘-‘ sign while the ‘Max’ parameter should be set to half the resolution of the encoder minus 1.
6. Now go to the menu ‘Scope->Connect’. Megastar will now start receiving the current encoders’ positions from Nexus.
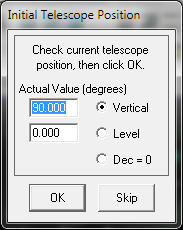
7. Once the communication is established go to the menu ‘Scope->Star Alignment’. The first step in aligning your telescope is to set it into either vertical position or horizontal position and then click on the ‘OK’ button on the pop up window ‘Initial Telescope Position’.
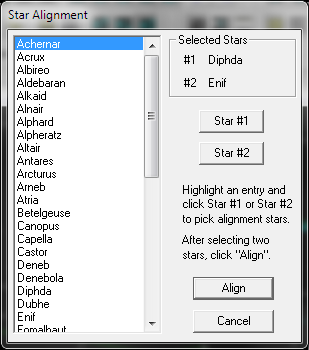
8. The next step in aligning the telescope is to select two stars from the list (select first star then click ‘Star #1’, select second star and click ‘Star #2’ – Diphda and Enif are used in this example) and click ‘Align’.
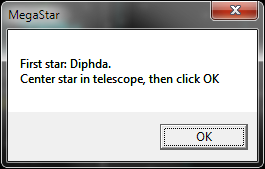
9. Now point the telescope to the first star and click the ‘OK’ button inside the pop up window.
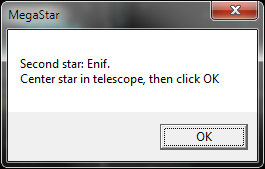
10. Now point the telescope to the second start and click the ‘OK’ button inside the pop up window. A pop up window will appear with the ‘Warp’ value. Please make sure that the value should be as close to 0 as possible.
11. Done!!! Now Megastar will be showing a telescope cursor where the telescope is pointing.